Tuesday, June 21, 2011
This is a test - trying something a little different
Did a little video of cartridge pleating made easy. Hope it works.
Sunday, June 5, 2011
Necessity is - well, you know the rest!
I love my sword cane! It's a glossy black with a gorgeous silver, oriental-ish dragon's head. Unfortunately, the blade length is probably illegal everywhere.
I wanted to use it at the Houston ComicPalooza as part of my steampunk costume. I didn't know if security at the con might include metal detectors and I didn't want to be explaining the intricacies of costuming bits and bobs to the not-so-nice officers.
My first thought was that I might be able to remove the sword blade. After some effort (and finding out that the blade is really sharp!), I was almost ready to give up.
Then, I looked at my new wand - glistening in all its black and silver glory. My inner Slytherin whispered - maybe you could put the wand in the cane in an homage to luscious Lucius Malfoy. Ok, I am a Hufflepuff but let's face it - there ain't no eye candy for us in the movies. Dead/sparkly Cedric/Edward just doesn't do it for me.
I slowly inserted the want into the cane, wondering how I could secure it in place. To my surprise, it fight snugly and with a few twists, was secured in place.
There is a downside - I lose about three inches in cane height, which is ok for me since I am short. For a taller person, the wand-cane might need to carried as a swagger stick or for the Potter-minded, a Smelting's stick.
 |
| Sword blade, cane, wand - that's a 15" blade |
 |
| Inspiration strikes! |
 |
| Now street -legal (until they outlaw wands) |
Monday, May 30, 2011
Bustle- ing About

Straight across the bottom and one side (center back) and curved at the top (marked waistline). You cut two and seam at center back, then gather on either side of this seam. So you now have a curved top and a curved bottom. You gather the curved top (marked waistline) to the waistband - after applying trim, etc. I am assuming the ties on the waistband go to the back where they can be tucked into the skirt or hidden by the jacket.
Actually pretty simple to make and hangs nicely - gives the hips a bit of bulk that looks good for this style.
Now, this is a short bustle. I decided to add a few things to make it my own. If you have been reading my blog, you know that I have no hesitation in cutting apart clothes for their bits and pieces. I happened to have half of a short black lace skirt and a shorter black lace overlay. I attached the black lace skirt under the bustle and the lace overlay on top. I like the layered effect.
Looking at clothes as simply pieces that I can reconfigure certainly adds a new dimension to my shopping trips.
Ross is always a happy hunting ground for me. I bought a gorgeous size 8 strapless silver gray evening dress just for the lovely bubble skirt. The price was right- $9.95. I saw a super-cute bustle. It took me about five minutes to rip open the back seam, gather the sides and pin on some trim.
Still trying to decide what type of waist closure to use. Most bustles have long ties that wrap around the waist at least once, but I don't like the bulk.
Have fun with all this stuff! Remember when you used to play dress-up? You still can. And if someone tells you to grow up, tell them you did!
The Frankenstein Skirt
My bad! I didn't take any before pictures but I think my explanations will suffice.
I had a cheap costume-taffeta black skirt - very unremarkable. It fit, but was a little snug. I wanted to add something to the waist band that would make it more comfortable. I split open the back seam and took out the zipper.
I also had a pretty ugly black and white formal that was too small. The top was cheesy, but the bottom was composed of several rows of scalloped organza.
Inspiration struck! I cut off the skirt and started playing with gathering the waistband to fit the gap in the waistband of the taffeta skirt. Gathering didn't work - to bulky. I think started experimenting with pleats. That worked perfectly. I added about an inch and a half on each side since I might want to wear the skirt over a couple of layers. I sewed each side of the organza skirt to the taffeta skirt, leaving about an 18" opening on one side which I will close with hooks, Velcro, or safety pins. The large opening will help when I want to pull the skirt on over my head.
So, I have about 36" of scalloped organza tiers gathered in to about 6" at the top and flowing nice down to the hem. The bustle effect is gorgeous. Can't wait to wear this one!
Pictures to come soon.
Thursday, May 19, 2011
Dueling Wands
I've been a Harry Potter fan since I read the first book years ago. That's a funny story. A friend had ordered the first two books from an English publisher - not sure if they were available in the States yet. He kept suggesting I read HP and the Philosopher's Stone. I just wasn't interested. Then, I was trapped at a beach house during a storm with a flashlight and HP/PS. I was hooked!
I have purchased wands...funny how they seem to disappear in my house (I suspect nargles). I've been cleaning out and organizing craft supplies and as the piles grew, the wands just came together.
Of course, I am wondering when and why I acquired some of this stuff.
12" dowel rods- 1/4" diameter
3" mini-candle holder about 3/8" diameter
Elmer's glue
Black, gold, silver acrylic paint
glue gun
silver and gold aglets
silver and gold buttons
Krylon Triple-Thick Crystal coating - this stuff is awesome
I decided to tackle the black and gold wand first. I wanted the wand to look old and well-used, as though the magic had melted and settled back into the finish.
I sanded and painted both the rod and the candle holder black. I mixed a little Elmer's glue with the gold paint and let it drip down from the top, pulling it down with a toothpick. I then did this with black paint and glue. I liked the look so I played with "sculpting" the texture using a toothpick and tweezers.
I used the hot glue gun for the gold button on the handle end and for gold aglet at the tip. I plan to attach a patronus charm to it when I can find a little gold badger.


Monday, May 16, 2011
Vampire Ball Gown
This gown started out life as a markdown at Ross (yeah, I spend a lot of time looking at the sale racks) and I snagged this one for $19.
The dress is a basic halter top, lace-across back so popular for prom. I liked the pickups on the skirt. My first alternation was adding black and silver rhinestones to the pickup points. Then I added a stretch lace ruffle around the top and allowed enough to make off-the-shoulder straps.
I wanted the swag effect in the front and a bustle in the back. I did this with some black lace.
 |
| Front View |
 |
| Detail Front |
 |
| Detail of pickup jewels |
 |
| Back View |
 |
| Non-resident Evil |
 |
| As the Evil Stepsister with Evil cohorts Laura and Simone - Laura is a costumer and Simon's husband designed and created her costume |
 |
| Disney princess invasion at Infinitus 2010 - our lovely Cinderella - Meka - made her dress |
Sure - it still fits!
For those of us who are amply endowed or as a friend used to say "possess substantial commodities" we tend to outgrow jackets across the bustline. It still fits across the shoulders and the arms are ok.
Such was the case with my very, very favorite velvet jacket which is now pushing 20. Nipped-in waist, bustle in the back - what's not to love. And I almost consigned it to the donate pile.
I tried it on and it still fit across the shoulders and in the arms, but I was looking at a 4-5" gap in the front. My first thought was to take off the original buttons, sew identical buttons on both sides and run some lacing or chains. That might be cute with a corset underneath the jacket. But my eyes fell upon a couple of very old and cheap FOH (Fredericks of Hollywood) back lace corsets also on the way out.
This was the end result.
 That's the lace-up back of the corset sewed across the gap in the jacket front. Easy to get into - I just unlace it slightly and pull it on over my head.
 I love the textures - great for Victorian and steampunk.
 Here is the gorgeous back - there is a layer of crinoline under the velvet.
 I usually wear the jacket with a high-necked lace blouse and and ankle-length lace skirt.
Now, what would I have done if the jacket was too tight or the sleeves didn't fit? Easy - if you are not afraid of a little ripping.
First, if the jacket has shoulder pads, take them out. This can be easy - just clipping a few threads, or major surgery if the pads were inserted between the lining and the outer fabric.
If that is the case, I usually open the lining at the shoulder seam very carefully, starting about a half-inch in from either the neck or the shoulder. In older jackets, the pad may be stiched down tightly.
If it's still too tight, take a close look at the lining. It may be the problem. Open the lining seam(s) starting about one-half inch from the neck, waist, shoulder, armhole, etc.
If the jacket is still a bit tight, consider adding an insert into the back or sides.
If the arms are too tight, but fit at the shoulders, consider opening the top or bottom seam on the sleeve but leaving it closed at the wrist. You could add a couple of pretty buttons on either side with ribbon ties.
Also, consider taking off the sleeves completely to make a vest. If you want the look of tie-on sleeves, sew some buttons at the shoulder and the top of the sleeves and use ribbons or chains to tie on the sleeves. Get fancy and make a shoulder roll or epaulettes.
Such was the case with my very, very favorite velvet jacket which is now pushing 20. Nipped-in waist, bustle in the back - what's not to love. And I almost consigned it to the donate pile.
I tried it on and it still fit across the shoulders and in the arms, but I was looking at a 4-5" gap in the front. My first thought was to take off the original buttons, sew identical buttons on both sides and run some lacing or chains. That might be cute with a corset underneath the jacket. But my eyes fell upon a couple of very old and cheap FOH (Fredericks of Hollywood) back lace corsets also on the way out.
This was the end result.


Now, what would I have done if the jacket was too tight or the sleeves didn't fit? Easy - if you are not afraid of a little ripping.
First, if the jacket has shoulder pads, take them out. This can be easy - just clipping a few threads, or major surgery if the pads were inserted between the lining and the outer fabric.
If that is the case, I usually open the lining at the shoulder seam very carefully, starting about a half-inch in from either the neck or the shoulder. In older jackets, the pad may be stiched down tightly.
If it's still too tight, take a close look at the lining. It may be the problem. Open the lining seam(s) starting about one-half inch from the neck, waist, shoulder, armhole, etc.
If the jacket is still a bit tight, consider adding an insert into the back or sides.
If the arms are too tight, but fit at the shoulders, consider opening the top or bottom seam on the sleeve but leaving it closed at the wrist. You could add a couple of pretty buttons on either side with ribbon ties.
Also, consider taking off the sleeves completely to make a vest. If you want the look of tie-on sleeves, sew some buttons at the shoulder and the top of the sleeves and use ribbons or chains to tie on the sleeves. Get fancy and make a shoulder roll or epaulettes.
Sunday, May 15, 2011
Christmas Anytime
#9 method to get people to stare at you while shopping - tie a Christmas tree skirt around your neck. They will move far, far away....all the better for you to get your hands on some neat stuff.
Seriously, you have never used Christmas stuff as or on clothing? It is really a lot of fun and cheap.
Back to the tree skirts - I was shopping at Walmart after Christmas and thought I would look at the decorations. My color scheme is black, white, silver, and gray and sometimes I get lucky. That year Walmart carried a line of black velvet tree skirts, stockings, and ornaments. And, yes, I managed to clear the aisle when I tried on the black velvet tree skirt.
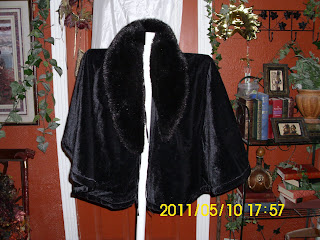 I added the fake fur collar. But it is the back view that makes this $2 find a rare gem.
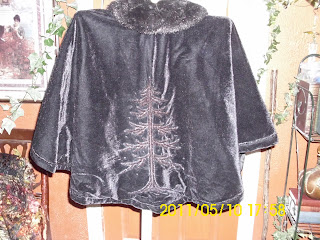 That is a beautiful tree outlined in black beads. I apologize for the lighting.
Not bad for a quick Victorian mantle - and no sewing required.
Here is my other find - this time at a Garden Ridge Pottery for $1. I have added the purple trim (reclaimed from another garment). I love the peacock colors and the hint of feathers in the back view.
Seriously, you have never used Christmas stuff as or on clothing? It is really a lot of fun and cheap.
Back to the tree skirts - I was shopping at Walmart after Christmas and thought I would look at the decorations. My color scheme is black, white, silver, and gray and sometimes I get lucky. That year Walmart carried a line of black velvet tree skirts, stockings, and ornaments. And, yes, I managed to clear the aisle when I tried on the black velvet tree skirt.


Not bad for a quick Victorian mantle - and no sewing required.
Here is my other find - this time at a Garden Ridge Pottery for $1. I have added the purple trim (reclaimed from another garment). I love the peacock colors and the hint of feathers in the back view.
 |
| Front view |
 |
| Back View |
Saturday, May 14, 2011
Always a Bridesmaid - Part 2
Starting to play with the dress just a bit. I put a high-necked, long-sleeved black lace blouse underneath and pinned some black rose trim to the neckline. I like the look so far. Still need to work with the sleeves.

Thinking of a couple of sleeve options. I could run some elastic and gather them slightly and use the same rose trim as I planned for the neck. I may use a smaller rose-themed trim for the waist.


Thinking of a couple of sleeve options. I could run some elastic and gather them slightly and use the same rose trim as I planned for the neck. I may use a smaller rose-themed trim for the waist.

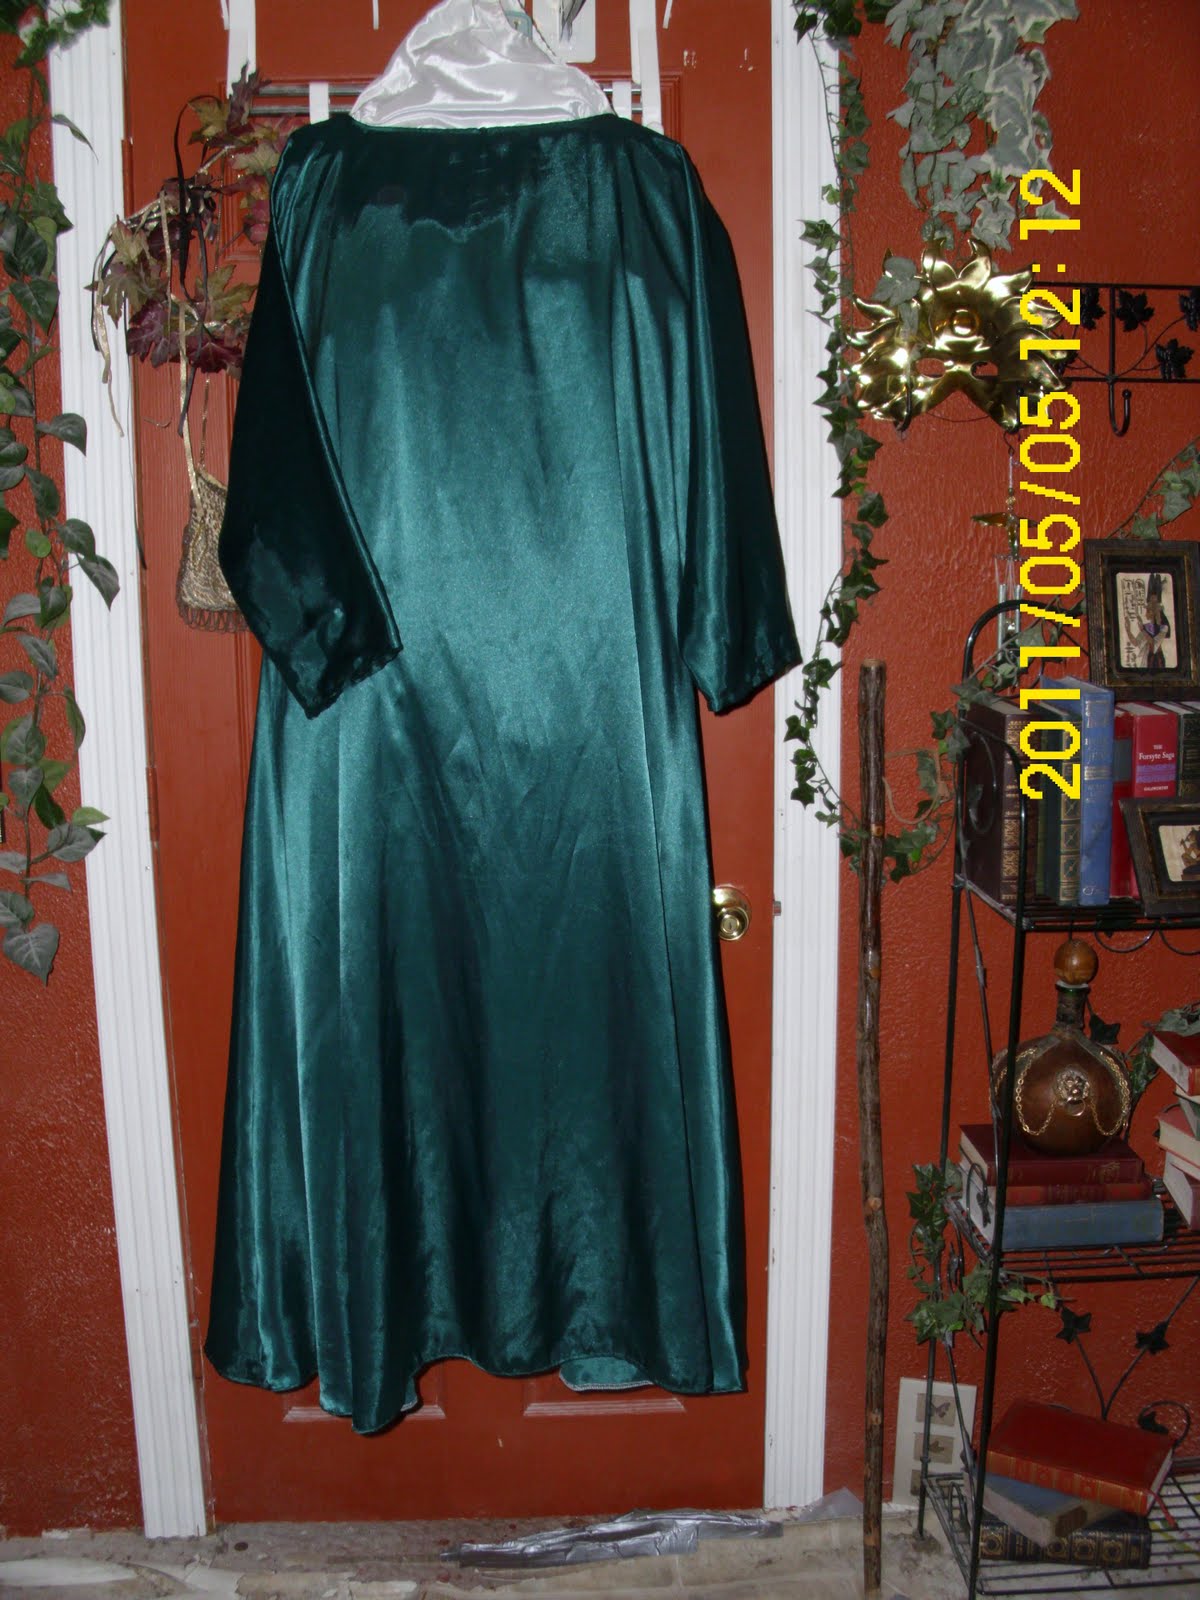
Always a Bridesmaid - What to do with the ugly dress
There they are - languishing on the racks of thrift stores everywhere - those what-were-they-thinking bridesmaid and mob/mog gowns.
Sometimes you get lucky - this one was black with no silly decorations and a $10 price tag. The top is an embroidered tone on tone brocade that doesn't suck and thankfully the skirt is unadorned. The short sleeves could be a problem - but there are remedies. And - there are no shoulder pads to remove!
I am thinking this could work for a quick Victorian day or evening look. The dress fits nicely, although it tends to hang off the shoulders a bit, but this could be an advantage.
The back has two nicely done satin roses and two long hanging tails. I look at these as extra material - maybe for lengthening the sleeves.
I collect vintage-looking shawls so I pulled out a few that might work. Paisley, roses, beading, and tassels are Victorian motifs. I wanted to soften the neck and sleeve lines.
Sometimes you get lucky - this one was black with no silly decorations and a $10 price tag. The top is an embroidered tone on tone brocade that doesn't suck and thankfully the skirt is unadorned. The short sleeves could be a problem - but there are remedies. And - there are no shoulder pads to remove!
I am thinking this could work for a quick Victorian day or evening look. The dress fits nicely, although it tends to hang off the shoulders a bit, but this could be an advantage.
 |
| Front view |
 |
| Back view |
I collect vintage-looking shawls so I pulled out a few that might work. Paisley, roses, beading, and tassels are Victorian motifs. I wanted to soften the neck and sleeve lines.
 |
| Silver-gray chiffon with embroidery, beadwork, tassels |
 |
| Openwork beads and tassels |
 |
Black and silver paisley |
 |
| Black lace with embroidered roses and tassels |
 |
| Chiffon with silver paisley and silver tassels |
 |
| I like the back view |
Monday, May 9, 2011
Of course I can do simple stuff
I do understand that less is more and I can prove it. The following tunics are perfect for the time-traveling witch or wizard, especially if you land in the 11th - 13th centuries.
Black heavy cotton gauze. The arced hem allows you to display a skirt or underdress. Great for Houston summer wear.

Burgundy Unisex Tunic - cotton/poly - another hot weather outfit
Jade tunic - simple, no trim, hugs curves beautifully and is great for displaying jewelry. Not the best for summer wear but at least you will look good!

Black heavy cotton gauze. The arced hem allows you to display a skirt or underdress. Great for Houston summer wear.

Burgundy Unisex Tunic - cotton/poly - another hot weather outfit
 |
| Front view -usually looks best for women |
 |
| Back view - looks best for men as tunic front |
The Phoenix Project
Overrobe - a bit oriental, a bit Queen Amidala-ish.
Underrobe - modified kimono
Gown - purchased
Easily the most complicate costume I have ever attempted. I wanted to create something really spectacular and original for Portus 2008. Since I am normally in black, I thought a complete color change might be in order. I've always loved the legend of the Phoenix and how variations appear in most cultures.
I wanted at least two pieces - a lightweight robe to convey flames and rebirth and a heavier robe to symbolize aging and death. I went through a lot of design concepts until I discovered the perfect fabric for the lighter robe - a red-orange-gold ombre chiffon overprinted with gold butterflies. I decided to make a modified kimono to minimize seaming. I still needed to find the fabric for the heavier robe and some trim for both.
I was tempted to title this post "You never know what you want until it hurts you" because the perfect fabric did just that - full bolt of a deep orange double layer Indian matte taffeta with dark gold diamond shapes every inch holding the two layers together. As I was carrying my treasure to the cutting counter, I dropped the bolt on my foot and discovered the perfect trim for the new fabric and my completed kimono.
And it gets better. A few weeks after completing the overrobe, I found a red-orange-yellow ombre evening dress for $2 at a thrift store.
The Overrobe with Kimono Underrobe and Gown
The Kimono Underrobe and Gown
The Gown
And, something I don't usually have - me wearing the costume.

This is the lightweight kimono. I draped a gold scarf over a white paper umbrella for a fun, mysterious look! This was taken at the Texas Renaissance Festival in late October or early November and the temperature was in the 80's.
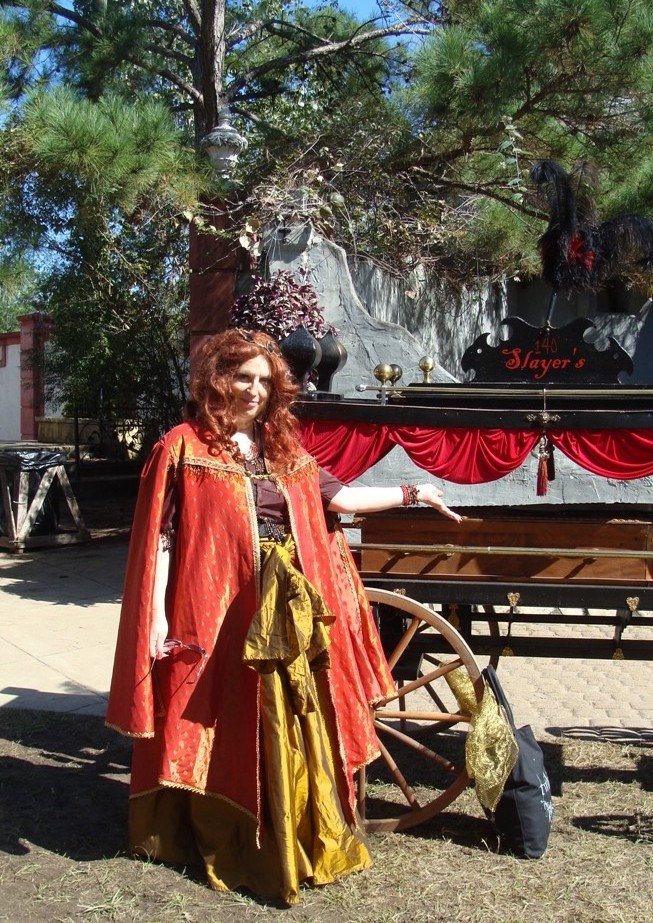
And another, taken at another Renaissance Festival. Did I mention it is hot in Houston even in the middle of winter? Here I am wearing the heavier overrobe with an Indian choli top and skirt.

Underrobe - modified kimono
Gown - purchased
Easily the most complicate costume I have ever attempted. I wanted to create something really spectacular and original for Portus 2008. Since I am normally in black, I thought a complete color change might be in order. I've always loved the legend of the Phoenix and how variations appear in most cultures.
I wanted at least two pieces - a lightweight robe to convey flames and rebirth and a heavier robe to symbolize aging and death. I went through a lot of design concepts until I discovered the perfect fabric for the lighter robe - a red-orange-gold ombre chiffon overprinted with gold butterflies. I decided to make a modified kimono to minimize seaming. I still needed to find the fabric for the heavier robe and some trim for both.
I was tempted to title this post "You never know what you want until it hurts you" because the perfect fabric did just that - full bolt of a deep orange double layer Indian matte taffeta with dark gold diamond shapes every inch holding the two layers together. As I was carrying my treasure to the cutting counter, I dropped the bolt on my foot and discovered the perfect trim for the new fabric and my completed kimono.
And it gets better. A few weeks after completing the overrobe, I found a red-orange-yellow ombre evening dress for $2 at a thrift store.
The Overrobe with Kimono Underrobe and Gown
 |
| Front View |
 |
| Front View - Detail |
 |
| Back View |
 |
| Back View - Detail |
 |
| Side View |
 |
| Front View |
 |
| Back View |
 |
| Front View |
 |
| Back View |

This is the lightweight kimono. I draped a gold scarf over a white paper umbrella for a fun, mysterious look! This was taken at the Texas Renaissance Festival in late October or early November and the temperature was in the 80's.
And another, taken at another Renaissance Festival. Did I mention it is hot in Houston even in the middle of winter? Here I am wearing the heavier overrobe with an Indian choli top and skirt.
Sunday, May 8, 2011
Peacock Robe
I love the colors in peacock feathers, but I have very bad luck with them. I had always wanted to do a peacock-inspired gown and was overjoyed when I found a beautiful blue/teal/purple brocade at Wal-Mart for $1 a yard (those were the days when Wal-Marts had fabric departments). Unfortunately, there were only three yards left on the bolt, so my treasure languished for a few years in my fabric horde.
When I was planning costumes for Portus 2008, I attended a garage sale and found a couple of of iridescent purple/teal/blue 72" wide heavy taffeta. I didn't have the right trim, but I started on the gown anyway. I managed to find the perfect trim and had to sew it on at the conference. I generally travel with enough sewing supplies to almost make an outfit!
It is similar in style to my Hufflepuff robe, but the stiffness of the taffeta gives a very different look. I shorted the train to a 18" sweep. I have not yet found the perfect gown to wear under the robe.
 |
| Front View |
 |
| Back View |
 |
| Side View |
Subscribe to:
Posts (Atom)